Osm2pgsql is a powerful command-line tool designed to efficiently import OSM
data into a PostgreSQL/PostGIS database. One of its noteworthy features is the
ability to use the Lua programming language at runtime to execute user-defined
scripts. This allows for extensive customization and transformation of the OSM
data as it is being loaded by the tool. This enables us to create very specific
tables, and store the data exactly how we need it.
In this blog, I’ll give an overview of the osm2pgsql command using OSM data.
I’ll explain how we can easily transform and customize the data using simple
Lua scripts to produce a concise and well-structured dataset that meets our
specific needs.
The osm2pgsql command
The osm2pgsql program is a simple command line tool
that can load a variety of OSM data-types into a PostgreSQL/Postgis database.
Basic usage of the tool looks like this:
osm2pgsql --create --output flex --schema osmplanet --style styles/style.lua osm-planet.osm.pbf
The --create flag tells the tool to create a new table (--append can be
used to add to an existing table). --output flex specifies that we will
customise the tool with the Lua script specified by the --script flag. And
finally, the --schema flag tells the tool which schema to use in the database
(the tool uses public by default). More details about the command and flags
can be found in the Man pages: man osm2pgsql.
During the import process, Osm2pgsql typically loads all of the OSM nodes into RAM before adding to the database. This makes loading very fast and efficient, but can use vast amounts of RAM. When I run the Osm2pgsql tool on a planet-wide osm.pbf file, I usually max out at around 90GB of RAM! My system has 128GB of DDR4 ECC RAM and a 12/24 core processor, so if I’m not doing anything else, my system can just about manage this.
If the system runs out of RAM during runtime, then loading will fail. If your
system is short on RAM, then you can use the --slim and --flat-nodes
arguments to store nodes on disk or in the database instead. This comes with a
massive performance hit though.
If using osm2pgsql with the --output flex option, it’s recommended to use a
build compiled with LuaJIT
support.
This will speed up parsing the OSM data by about 15%
Connecting to the database
Firstly, a PostgreSQL instance is needed with the Postgis extension installed. For loading planet-wide data, be aware that the database will need fine-tuning, as default PostgreSQL configuration is not suitable for large databases,
Information on preparing the database for use by osm2pgsql can be read
here.
Once the database is configured with the necessary extensions installed, you can
add the database credentials to a .env file in the same directory as the osm2pgsql
command will be run. It should look something like this:
export PGHOST=localhost
export PGPORT=5432
export PGDATABASE=gisdb
export PGUSER=gisuser
export PGPASSWORD=abc1234password
This should be sourced before running the osm2pgsql command. For convenience,
this can all be done in a single script:
#!/usr/bin/env bash

source .env
osm2pgsql --create --output flex --schema osmplanet --style styles/style.lua osm-planet.osm.pbf
The data file
OSM data files can be obtained from various sources. I use the planet-wide file as I like to have all OSM data available in my database, but you can easily just use an extract for a particular region instead. If you do intend to import planet-wide data, I’d advise testing the script with a small region first to make sure everything imports correctly, as planet-wide imports can take several hours.
The latest planet-wide file can be imported using cURL:
curl -OL https://planet.openstreetmap.org/pbf/planet-latest.osm.pbf
Or alternatively, regional extracts can be downloaded from geofabrik, or city level extracts from bbbike.
This will download Singapore (which is only about 25MB):
curl -OL https://download.bbbike.org/osm/bbbike/Singapore/Singapore.osm.pbf
The Lua script
The Lua script has two parts, the first defines the structure of the output table, and the second defines functions that transforms the data to the new structure.
Defining our table
A table is defined in Lua like so:
local placenames = osm2pgsql.define_table({
  name = "placenames",
  ids = { type = "any", id_column = "osm_id", type_column = "osm_type" },
  columns = {
    { column = "name", type = "jsonb" },
    { column = "type", type = "text" },
    { column = "geom", type = "point", projection = 4326, not_null = true },
  },
})
Here we define a table called placenames. The idea of this table is to
indicate the name and type of a particular location as a single point. This
includes the names of significant human settlements such as villages, towns and
cities or regions such as countries or islands. More information on the place
tag can be found on the OSM
Wiki
I often use place names in my maps and GIS analyses to label significant locations, therefore it’s useful to have a global place names table that I can easily access in my database.
The ids field in the above snippet defines the ID columns. Here we specify
that the object ID column will be named osm_id, and the column that specifies
the object type as osm_type. So, for example, the osm_id could be
331952687 and the osm_type N for a node. The type = "any" part
specifies the OSM types allowed within in the table. More information on
id handling can be found
here.
It’s useful to set these values, as you can later refer back to the original OSM object by the ID and type in the future. This is also mandatory information if you later wish to update your table from OSM diff files. I wont go into updating tables in this blog, but more information can be found here.
The columns field defines the columns that we wish to populate in the script.
The name of the column is defined, along with other information such as the
data type and projection (for geometry columns).
In the above example, we have created a name column of type text, a type
column of type text, and a geom column of geometry type point with a
projection of 4326. Of course, more columns can be defined here depending on
your use-case, for example, for the place tag, you could include the
population and admin_level fields too if you wanted.
Here is a list of the different data types available:
- text
- bool, boolean
- int2, smallint
- int4, int, integer
- int8, bigint
- real
- hstore
- json
- jsonb
- direction
- geometry
- point
- linestring
- polygon
- multipoint
- multilinestring
- multipolygon
- geometrycollection
The final table structure should look something like this:
| osm_type | osm_id | name | type | geom |
|---|---|---|---|---|
| N | 1234 | abcd | abcd | 0000 |
Data mapping functions
The data mapping functions are where the magic happens. Custom logic can be implemented here to filter, transform and manipulate the data in any you can think of. There are also several built-in functions that can be applied to OSM objects before they are inserted into the table. More details on the built-in functions can be found here and here.
There are three main processing callback functions available:
osm2pgsql.process_node(object)osm2pgsql.process_way(object)osm2pgsql.process_relation(object)
There are also an additional three functions for processing untagged objects too, but I wont go in to that. More information can be found here.
These functions act on each of the osm objects in sequence from the input file,
and is where we can define our custom logic. At least one of these functions
needs to be defined, but not all of them are necessary. If you don’t want to
process relations, then the process_relation function can be omitted. If
there is an object that you do not want included in the final table, then the
object can be filtered out using conditional logic and returning the function.
A very simple implementation of this for our placenames example could look like
this:
local function process_nodes(object)
  if object.tags.place then
    local names, has_names
    names, has_names = lib.create_name_field(object)

    if has_names then
      placenames:insert({
        name = names,
        type = object.tags.place,
        geom = object:as_point(),
      })
    end
  end
end
There are a few things happening here.
- Firstly, we are processing only nodes with the
process_nodesfunction. - We then only include objects if the
object.tags.placefield exists. - Then we define some custom logic for testing if the
placetag has a name field. In this instance we want to remove objects where the name field is blank (as this is a place name table after-all!), then we refactor that field using thecreate_name_field()function (see below). - If the name field exists, we then insert the object into the table with the
insert()function. - At this point we also convert the object to a point geometry using the built-in
as_point()function.
Place names can exist in several different languages. The convention with OSM
is that the local name (as known by people on the ground at the
location) is the default name, and is often populated under the name tag.
Sometimes additional languages are included, and for example are defined in a
subtag like this name:en for English or name:ar for Arabic etc.
For my placenames table example, I’d like to prioritise English names. So ideally, if
an name:en tag exists, that tag should be used in my name field before the
OSM default name tag. This is the logic I’d like to use:
name:en > name > name:any
An example tag with multiple place names in different languages looks like this:
| Key | Value |
|---|---|
| addr:postcode | 35470 |
| name | Bain-de-Bretagne |
| name:br | Baen-Veur |
| name:fr | Bain-de-Bretagne |
| name:fr-x-gallo | Bouin |
| name:uk | Бен-де-Бретань |
| place | village |
In this example, the name tag Bain-de-Bretagne will be preferred over the
others.
I’ve created a custom function in Lua to do just that:
-- Create custom name field that prioritises English names

local function create_name_field(object)
  local name, name_en, name_default, name_other
  local has_name = false
  for k, v in pairs(object.tags) do
    if k == "name" then
      name_default = v
      has_name = true
    elseif k == "name:en" then
      name_en = v
      has_name = true
    elseif string.match(k, "^name:") then
      name_other = v
      has_name = true
    end
  end
  name = name_en or name_default or name_other
  return name, has_name
end
This function uses the name:en tag if available, else it’ll fallback to the name tag
(i.e. local language), then as a final fallback, it’ll pick any one of the other languages
matching name:*.
Sometimes places are not defined by a node, instead they can be relations or
ways. For example, islands are often depicted as relations. So in our
placenames script, we also want to process nodes and ways. However, I am only
interested in including point geometries for this table. Here is an example of
a place that is a
relation.
In this circumstance, we can use the built-in centroid() function on a line/polygon
geometry to get the center-point of that geometry.
Here is an example of the process_ways and process_relations callback
functions in action:
local function process_ways(object)
  if object.tags.place then
    local names, has_names
    names, has_names = lib.create_name_field(object)

    if has_names then
      placenames:insert({
        name = names,
        type = object.tags.place,
        geom = object:as_linestring():centroid(),
      })
    end
  end
end

local function process_relations(object)
  if object.tags.place then
    local names, has_names
    names, has_names = lib.create_name_field(object)

    if has_names then
      placenames:insert({
        name = names,
        type = object.tags.place,
        geom = object:as_multipolygon():centroid(),
      })
    end
  end
end
Here we convert ways to a linestring geometry, and relations into a polygon geometry, before finding the centroid of these geometries and inserting into the table as a point.
The whole script
The whole script looks like this:
--
-- lua script to be used with the osm2pgsql command
-- creates a PostgreSQL table called `placenames` with the following columns:
-- osm_type|osm_id|name|type|admin_level|population|geom
--

-- define a table
local placenames = osm2pgsql.define_table({
  name = "placenames",
  ids = { type = "any", id_column = "osm_id", type_column = "osm_type" },
  columns = {
    { column = "name", type = "text" },
    { column = "type", type = "text" },
    { column = "admin_level", type = "text" },
    { column = "population", type = "text" },
    { column = "geom", type = "point", projection = 4326, not_null = true },
  },
})

-- custom function for creating a name field that prioritises English names
local function create_name_field(object)
  local name, name_en, name_default, name_other
  local has_name = false
  for k, v in pairs(object.tags) do
    if k == "name" then
      name_default = v
      has_name = true
    elseif k == "name:en" then
      name_en = v
      has_name = true
    elseif string.match(k, "^name:") then
      name_other = v
      has_name = true
    end
  end
  name = name_en or name_default or name_other
  return name, has_name
end

-- the callback functions for processing and transforming OSM objects
function osm2pgsql.process_node(object)
  if object.tags.place then
    local names, has_names
    names, has_names = create_name_field(object)

    if has_names then
      placenames:insert({
        name = names,
        type = object.tags.place,
        admin_level = object.tags.admin_level,
        population = object.tags.population,
        geom = object:as_point(),
      })
    end
  end
end

function osm2pgsql.process_way(object)
  if object.tags.place then
    local names, has_names
    names, has_names = create_name_field(object)

    if has_names then
      placenames:insert({
        name = names,
        type = object.tags.place,
        admin_level = object.tags.admin_level,
        population = object.tags.population,
        geom = object:as_linestring():centroid(),
      })
    end
  end
end

function osm2pgsql.process_relation(object)
  if object.tags.place then
    local names, has_names
    names, has_names = create_name_field(object)

    if has_names then
      placenames:insert({
        name = names,
        type = object.tags.place,
        admin_level = object.tags.admin_level,
        population = object.tags.population,
        geom = object:as_multipolygon():centroid(),
      })
    end
  end
end
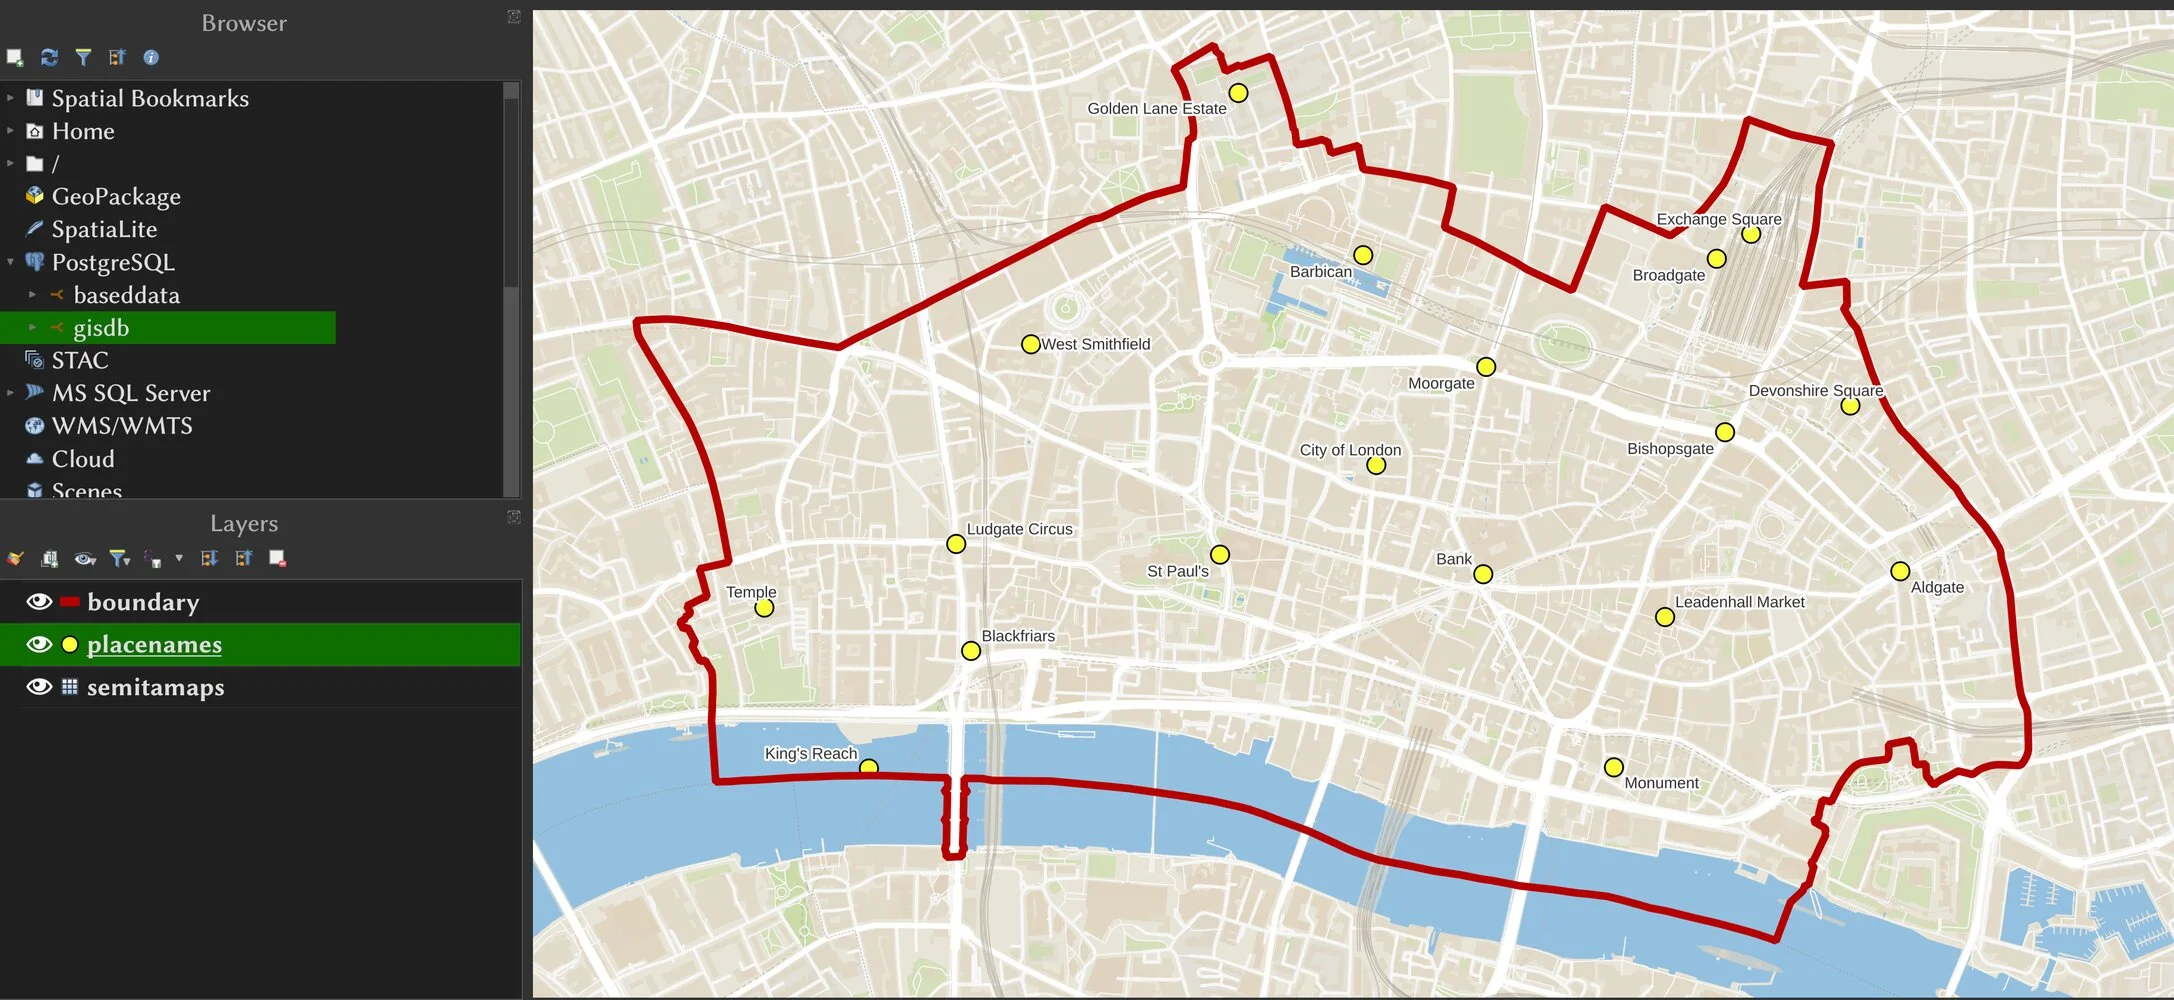
Using our table
To use our placenames table, we can write a simple query like this. I also
have an administrative_boundaries table in my Postgis database (Lua script
available
here),
so we can use that to select all places in the City of London using the
following query:
with
    placenames as (select * from osmplanet.placenames),

    admin_area as (
        select st_polygonize(geom) as geom
        from osmplanet.administrative_boundaries
        where admin_level = '6' and name = 'City of London'
    )

select a.osm_id, a.geom, a.name
from placenames a
join admin_area b on st_intersects(b.geom, a.geom)
We can then import that into GIS software such as QGIS: